Как правильно отполировать автомобиль в домашних условиях?
Anna Tkach
AutoPortal editorial team
403 views
2 min read
Полировка автомобиля - важный этап ухода за кузовом. Она позволяет не только вернуть блеск краске, но и удалить мелкие царапины, следы от реагентов и налёта. В этом материале подробно разберём, как отполировать автомобиль своими руками, какие материалы использовать и как провести процедуру безопасно в домашних условиях.
1. Зачем нужна полировка автомобиля
Полировка решает несколько задач:
восстанавливает блеск и насыщенность цвета;
удаляет лёгкие царапины, следы от химии и воды;
подготавливает поверхность под защитные покрытия и воски.
Даже если кузов выглядит чистым, после зимы или длительной эксплуатации полировка поможет автомобилю «ожить».
2. Подготовка автомобиля к полировке
Прежде чем отполировать автомобиль самостоятельно, подготовьте поверхность:
Вымойте кузов с автомобильным шампунем, смойте всю грязь и пыль.
Обязательно просушите автомобиль мягкой микрофиброй, чтобы вода не оставила разводов.
Осмотрите кузов на наличие глубоких царапин и сколов - глубокие дефекты лучше устранить шпатлёвкой или обратиться к специалисту.
Подготовка поверхности - ключ к ровному и качественному результату.
3. Выбор материалов и инструментов
Для домашней полировки понадобятся:
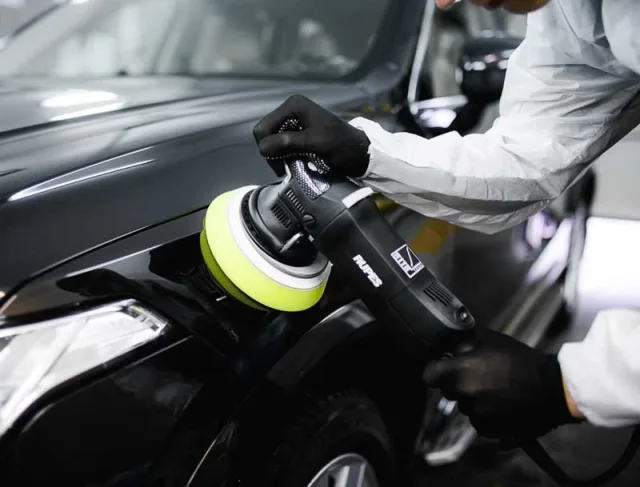
Полировальная машинка (для больших площадей) или ручные круги;
Полировальная паста (абразивная и финишная);
Мягкие микрофибровые полотенца;
Воск или защитное покрытие для закрепления результата.
Если вы решили отполировать автомобиль самостоятельно, выбирайте пасту, подходящую к типу краски и состоянию поверхности. Для новичков лучше использовать мягкие финишные составы.
4. Этапы полировки
4.1 Абразивная полировка
Используется для устранения мелких царапин и следов окисления.
Нанесите небольшое количество пасты на полировальный круг или вручную на участок кузова.
Равномерно распределите круговыми движениями, без чрезмерного давления.
Обрабатывайте участок 50-60 см² за раз.
4.2 Финишная полировка
После абразивной полировки наносится финишная паста для придания блеска:
Наносится тонким слоем на микрофибру или круг;
Полируется круговыми движениями до ровного глянца;
Убирается остатки мягкой тканью.
4.3 Нанесение защитного слоя
После полировки рекомендуется покрыть автомобиль воском или нанести жидкое стекло:
Воск защищает от пыли, воды и химии;
Удерживает блеск на 3-6 месяцев.
5. Полировка вручную
Если нет машинки, полировать автомобиль своими руками тоже можно:
Нанесите пасту на мягкую губку или микрофибру;
Используйте круговые движения, умеренное давление;
Регулярно меняйте ткань, чтобы не переносить грязь на кузов.
Полировка вручную требует больше времени, но результат при аккуратной работе почти не отличается от машинного метода.
6. Полезные советы
Работайте на тени, чтобы видеть дефекты и не пропустить участок.
Не полируйте на горячем солнце - паста высыхает слишком быстро.
Не экономьте на микрофибровых тканях - они не оставляют ворса.
Для металлических и перламутровых красок выбирайте специальную пасту, чтобы не потерять глубину цвета.
Всегда проверяйте участок сначала на небольшом участке, чтобы убедиться, что паста подходит к краске.
7. Итог: как отполировать автомобиль в домашних условиях
Подготовьте кузов: мойка, сушка, устранение мелких дефектов.
Выберите материалы и инструменты: паста, машинка или микрофибра, защитное покрытие.
Проведите абразивную полировку для устранения дефектов.
Финишная полировка для придания блеска.
Нанесите воск или защитное покрытие.
Используйте ручную полировку там, где машинка недоступна.
Следуя этим шагам, можно правильно отполировать автомобиль самостоятельно, вернуть блеск и защитить кузов на долгое время.