Неисправный датчик уровня топлива доставляет массу неудобств: стрелка на приборке может «зависнуть» в одном положении, показывать пустой бак при полном или наоборот. Чтобы понять, что вышло из строя - сам датчик или проводка, разберем подробно, как проверить датчик уровня топлива мультиметром, а также приведем примеры для популярных моделей - ВАЗ 2101, 2106, 2109, 2110, 2114 и Chevrolet Aveo.
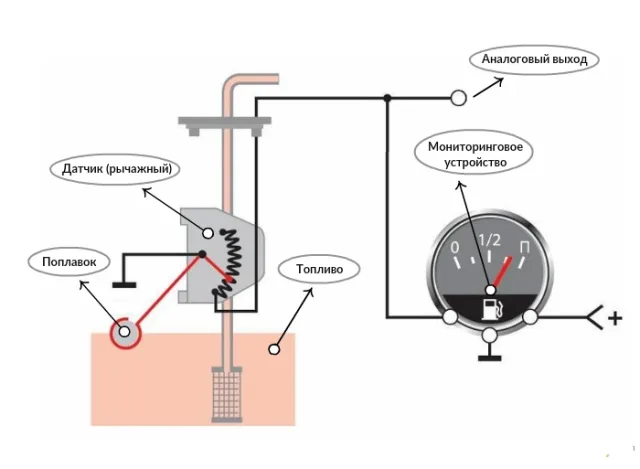
Принцип работы датчика уровня топлива
Датчик уровня топлива (ДУТ) чаще всего выполнен в виде реостата - переменного сопротивления. Поплавок, соединённый с рычагом, движется вверх-вниз в зависимости от количества бензина в баке, изменяя сопротивление. Приборка считывает этот сигнал и перемещает стрелку. Если где-то нарушается контакт или сам реостат изнашивается, показания становятся некорректными.
Как проверить датчик уровня топлива мультиметром
Что понадобится:
мультиметр (в режиме измерения сопротивления),
доступ к разъему датчика,
иногда - съём бака или демонтаж заднего сиденья (в зависимости от модели).
Пошаговая проверка:
Снимите разъем с датчика. Обычно он находится сверху топливного бака.
Выставьте мультиметр на режим «Ом» (до 200 или 2k Ом).
Подключите щупы к выводам датчика.
Плавно перемещайте поплавок рукой.
Сопротивление должно меняться линейно: от минимального (пустой бак) до максимального (полный бак).
Если показания скачут или не меняются - датчик неисправен.
Как проверить датчик уровня топлива на разных авто
ВАЗ 2101
На «копейке» датчик снимается через багажник. Проверка мультиметром аналогична: диапазон сопротивления должен быть примерно от 7-10 Ом (пусто) до 250-300 Ом (полный бак).
ВАЗ 2106
Принцип работы такой же, доступ к датчику - через багажник. При проверке обращайте внимание на равномерность изменения сопротивления, иначе стрелка будет «дергаться».
ВАЗ 2109
На «девятке» датчик совмещен с бензонасосом (в зависимости от года). Проверить можно прямо через лючок под задним сиденьем. Нормальные значения: около 5-10 Ом (пусто) и до 250-350 Ом (полный).
ВАЗ 2110 и 2114
У этих моделей датчик также встроен в модуль топливного насоса. Проверка мультиметром идентична: смотрим плавное изменение сопротивления при перемещении поплавка. Если показания скачут, значит, дорожки реостата стерлись.
Chevrolet Aveo
На «Авео» доступ к датчику через люк под задним сиденьем. Сопротивление в среднем от 40 Ом (пустой бак) до 250 Ом (полный). Проверка мультиметром та же: плавность хода и стабильные показания.
Дополнительные способы диагностики
Проверка приборки. Иногда дело не в датчике, а в указателе топлива. Для проверки замкните провода, идущие к датчику: стрелка должна резко уйти вверх. Если нет - проблема в панели приборов.
Проверка проводки. Окислившиеся контакты и поврежденные провода часто приводят к ложным показаниям.
Визуальный осмотр. Поплавок может треснуть и наполняться бензином - тогда он тонет и датчик показывает пустой бак.
Итог
Теперь вы знаете, как проверить датчик уровня топлива мультиметром. Алгоритм одинаков для большинства машин: снимаем разъем, подключаем мультиметр и смотрим, меняется ли сопротивление при движении поплавка. Для конкретных моделей:
ВАЗ 2101, 2106, 2109, 2110, 2114 - нормальный диапазон около 5-10 Ом (пустой) до 250-350 Ом (полный).
Chevrolet Aveo - 40-250 Ом.
Если сопротивление не меняется или скачет - датчик под замену.