Состояние тормозной системы напрямую влияет на безопасность водителя и пассажиров. Одной из важнейших её частей являются тормозные колодки, которые изнашиваются в процессе эксплуатации и требуют регулярной замены. Многие автолюбители задаются вопросом, как заменить тормозные колодки самостоятельно, не обращаясь в сервис. Процесс не слишком сложный, но требует аккуратности и правильной последовательности действий.
Когда пора менять колодки
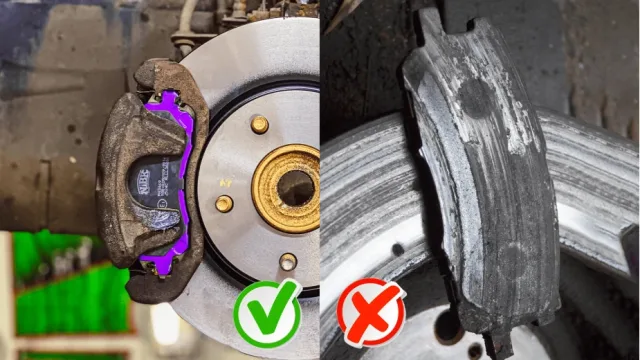
Прежде чем разбирать, стоит понять, в каких случаях требуется замена. Обычно тормозные колодки служат от 20 до 40 тысяч километров, но срок зависит от стиля вождения и качества деталей. О наступлении времени замены сигнализируют скрип, вибрации при торможении, увеличенный тормозной путь и появление характерного запаха гари. На некоторых моделях стоят датчики износа, которые выводят предупреждение на панель приборов.
Подготовка к замене
Перед тем как приступить к работе, нужно подготовить набор инструментов: домкрат, баллонный ключ, головки и вороток, отвёртку, молоток и, конечно, новые колодки. Также стоит заранее найти ровную площадку, установить автомобиль на ручной тормоз и подложить противооткатные упоры.
Как заменить передние тормозные колодки на ВАЗ 2114
Чтобы понять, как заменить передние тормозные колодки на ваз 2114, нужно пошагово выполнить несколько действий. Сначала поддомкратьте переднюю часть машины и снимите колесо. Затем открутите направляющие суппорта и аккуратно сдвиньте его в сторону, не повреждая тормозной шланг. Старые колодки вынимаются легко, но иногда приходится слегка поддеть их отвёрткой. Перед установкой новых колодок поршень суппорта нужно утопить внутрь, чтобы обеспечить место для более толстых накладок. После этого ставим новые колодки, возвращаем суппорт на место и затягиваем крепления.
Как заменить передние тормозные колодки на ВАЗ 2106
Многие владельцы классических моделей интересуются, как заменить передние тормозные колодки на ваз 2106. Процесс очень похож на ВАЗ 2114, но есть нюанс: на «шестёрке» суппорт массивнее, и его иногда нужно полностью снять, чтобы заменить колодки. При обратной установке важно проверить, чтобы тормозные цилиндры не заклинивали, иначе новые колодки быстро сотрутся.
Как заменить передние тормозные колодки на ВАЗ 2109
Для тех, кто хочет знать, как заменить передние тормозные колодки на ваз 2109, порядок действий практически такой же, как и на ВАЗ 2114. Главное - после замены несколько раз нажать на педаль тормоза, чтобы поршень суппорта встал в рабочее положение, и только потом отправляться в путь.
Замена колодок на иномарках
Устройство тормозных механизмов у зарубежных автомобилей может немного отличаться, но в целом процедура остаётся одинаковой. Например, многие владельцы спрашивают, как заменить передние тормозные колодки на Ланосе. Здесь также снимается колесо, откручиваются болты суппорта, старые колодки вынимаются, а новые устанавливаются на их место. Важно не забыть очистить направляющие и смазать их специальной пастой, чтобы колодки свободно двигались и не скрипели. Ещё один частый вопрос: как заменить задние тормозные колодки на Рено Кенго. В задних тормозах часто используются барабаны, поэтому процесс отличается. Нужно снять барабан, освободить возвратные пружины, убрать старые колодки и поставить новые. Работа более трудоёмкая, но при аккуратности вполне выполнима самостоятельно. Многим полезно знать и как заменить тормозные колодки на Рено Логан. Здесь процедура похожа на замену на Ланосе, но требуется ключ на 13 и на 15 для суппортов. На задних колесах Рено Логан также могут стоять барабаны, поэтому замена потребует времени и аккуратности. Не менее актуален вопрос, как заменить тормозные колодки на Киа Рио. Здесь принцип работы аналогичный, но стоит учитывать, что на некоторых версиях автомобилей могут стоять датчики износа, которые необходимо правильно подключить при установке новых колодок.
Итог
Теперь вы знаете, как заменить тормозные колодки автомобиля на разных моделях: будь то ВАЗ 2106, 2109, 2114, Ланос, Рено Кенго, Логан или Киа Рио. Работа требует внимательности, но при наличии минимального набора инструментов её вполне реально выполнить своими руками. Главное - после установки новых деталей не забыть про обкатку: первые 200-300 км тормозить плавно, избегая резких остановок, чтобы фрикционные накладки приработались к дискам или барабанам