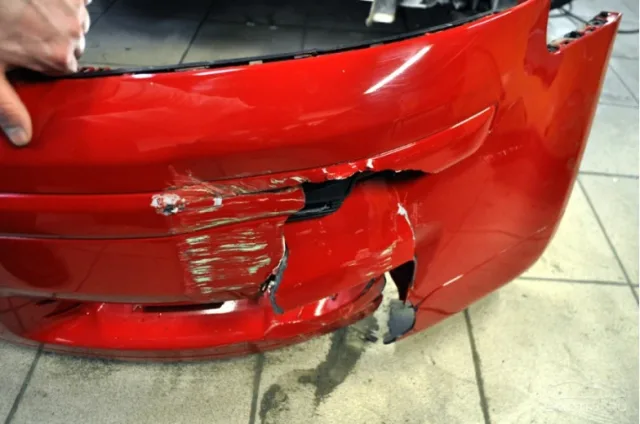
Повреждения бамперов - одна из самых частых проблем для владельцев авто. Камни, неудачные парковки или мелкие ДТП могут привести к трещинам и сколам на пластмассовом элементе кузова. Покупка нового бампера часто обходится дорого, поэтому многие автовладельцы предпочитают отремонтировать деталь самостоятельно. В этой статье разберём, как запаять бампер в домашних условиях, включая способы с применением металлической сетки и стяжек, а также особенности ремонта на примере ВАЗ-2110.
Какие материалы и инструменты понадобятся
Перед тем как запаять пластиковый бампер авто, нужно подготовить:
строительный фен или паяльник мощностью от 60 Вт;
металлическую сетку (для усиления шва);
пластиковые стяжки (хомуты);
ножницы по металлу;
наждачную бумагу (зернистость 80-240);
обезжириватель;
шпатель и шпатлёвку по пластику;
перчатки и защитные очки.
Подготовка поверхности
Снятие детали. Для качественного ремонта бампер лучше демонтировать с авто. Это позволит обеспечить равномерный доступ к месту повреждения.
Очистка. Промойте деталь водой с мылом и тщательно удалите грязь.
Обезжиривание. Протрите трещину и прилегающую область растворителем или специальным обезжиривателем.
Фаска. С помощью ножа или болгарки слегка снимите кромку по линии трещины, чтобы шов лучше держался.
Как запаять бампер сеткой
Этот способ применяется, когда нужно восстановить прочность пластмассового элемента.
Разогрейте паяльник.
Нарежьте металлическую сетку так, чтобы она перекрывала трещину минимум на 1-2 см с каждой стороны.
Приложите сетку с внутренней стороны бампера.
Аккуратно утопите её в расплавленный пластик, прогревая паяльником.
После остывания сетка станет частью бампера, образуя прочный каркас.
Такой ремонт особенно эффективен для больших трещин и изломов.
Как запаять бампер стяжками
Метод подходит для временного ремонта или придания дополнительной жёсткости.
Просверлите вдоль трещины отверстия диаметром около 3-4 мм с шагом 1-1,5 см.
Соедините края пластика пластиковыми стяжками, затягивая их до плотного прилегания.
Излишки хомутов обрежьте.
Для долговечности можно дополнительно пройти шов паяльником с внутренней стороны.
Как запаять бампер на ВАЗ-2110
У бамперов ВАЗ-2110 часто используется пластик типа ПП (полипропилен). Он хорошо поддаётся пайке, но требует умеренного нагрева - перегрев приведёт к деформации.
Снимите бампер с автомобиля.
Определите тип пластика (обычно маркировка указана с внутренней стороны).
Используйте паяльник или строительный фен с температурой около 250-300 °C.
Для прочности добавьте полосу пластикового прутка из такого же материала.
После пайки обработайте место шва наждачкой и при необходимости нанесите шпатлёвку.
Финальная обработка
После того как удалось запаять бампер авто, нужно:
Зашлифовать место ремонта.
Нанести грунт для пластика.
Покрасить деталь в цвет кузова.
При аккуратном выполнении работ место повреждения будет практически незаметно. Запаять пластмассовый бампер в домашних условиях вполне реально. Сетка обеспечит прочность, стяжки помогут быстро восстановить форму, а знание особенностей вашего авто - например, ВАЗ-2110 - сделает ремонт долговечным. Такой подход позволяет сэкономить и вернуть автомобилю аккуратный внешний вид без дорогого сервиса.
Advertising
Comments
No comments yet. Say the first word.
Write a comment
No sign-up needed - just your name.
Write